
To schedule an email in Outlook on the web or the new Outlook, write your message, click the arrow next to Send, then select Schedule send. Pick a time and click Send.
In this tutorial, I’ll show you how to schedule an email in Outlook step by step, how to set your own date and time, where the scheduled message waits, how to send it early, and how delayed delivery works in classic Outlook for Windows.
Schedule send in Outlook on the web and the new Outlook
I schedule emails all the time so my crew gets their plans first thing in the morning, not at 10 PM when I finally finish them. Microsoft uses the same steps for Outlook on the web, Outlook.com and the new Outlook for Windows.
Here’s the exact path I followed on November 3, 2026, with a test email to myself called “Crew schedule – week of November 9, 2026.”
- Click New mail and fill in the recipient, subject and message as usual.
- Click the small arrow next to the Send button. A menu opens with Send, Schedule send and Start mail merge.
- Select Schedule send.
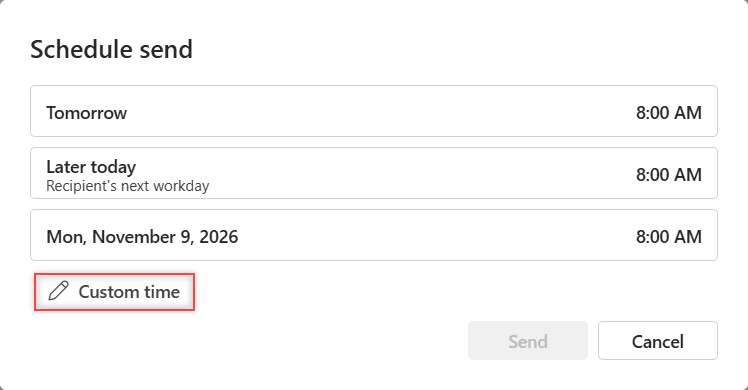
- Pick a suggested time, or choose Custom time to set your own.
- Click Send.
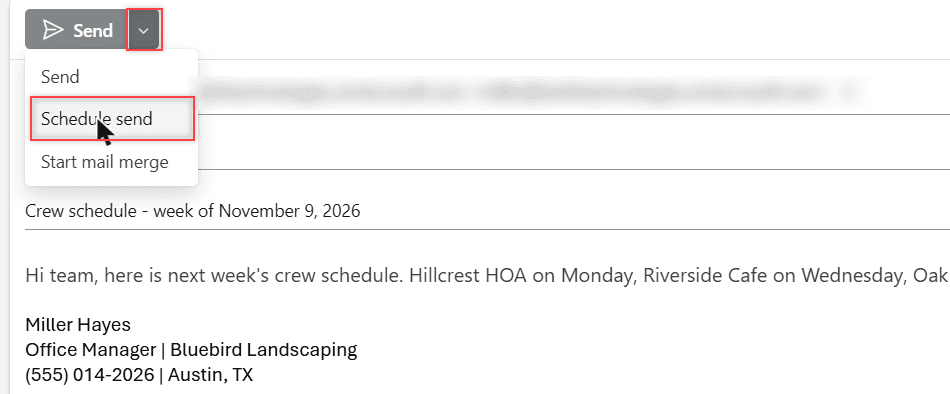
My message listed the Hillcrest HOA job for Monday, Riverside Cafe for Wednesday and Oak Street for Friday, with my signature at the bottom.
If you add your sign-off to every email, a saved signature saves a few clicks, and the same goes for reusable Outlook email templates.
The Schedule send box showed me four choices:
- Tomorrow 8:00 AM
- Later today 8:00 AM, labeled “Recipient’s next workday”
- Mon, November 9, 2026 8:00 AM
- Custom time, with a pencil icon
Your suggested times may look different from mine, since I opened the box on a Tuesday. The Send button stays greyed out until you pick one, and Cancel closes the box without scheduling anything.
Pick your own date and time with Custom time
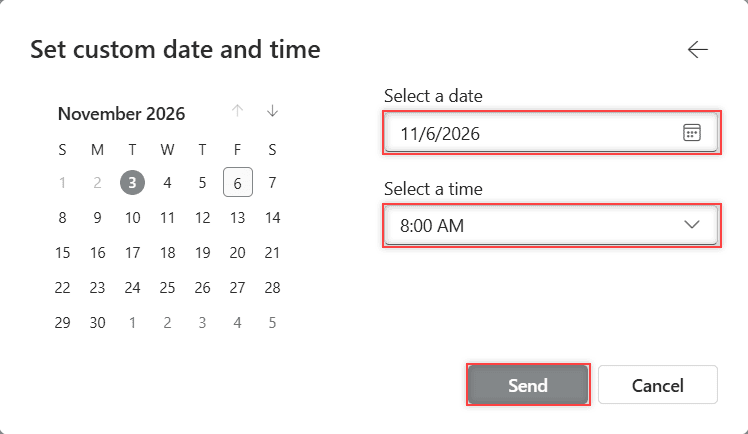
None of the suggested times fit my plan, so I clicked Custom time. That opened a box called Set custom date and time with a November 2026 calendar.
- In Select a date, click the day you want. I picked 11/6/2026, a Friday.
- Open the Select a time dropdown and choose the time. I chose 8:00 AM.
- Click Send to schedule it, or use the back arrow to return to the suggested times.
I like a weekday morning time for work emails, since people open them at their desk. If you’re going to be away when it lands, pair it with automatic replies in Outlook so nobody waits on you.
Find, send early or cancel a scheduled email
After I clicked Send, the email didn’t go to Sent Items. It sat in my Drafts folder with a red [Scheduled] tag in front of the subject.
When I opened it, a bar at the top said “This message is scheduled to be sent this Fri 8:00 AM.” Next to it was a Cancel send button, and the draft showed “Saved: Tue 11/3/2026 7:32 AM.”
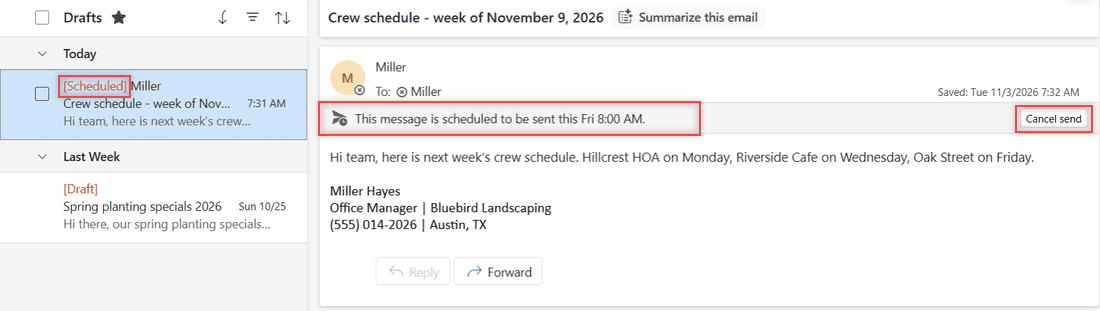
According to Microsoft, if you want the message to go out right away instead, open it from Drafts, select Cancel send, then select Send. I didn’t need to send mine early, so I left the schedule in place.
A scheduled email is still a draft until it leaves, so it’s a good time to give it a last look. If it holds private details, you can also mark the email as confidential before it goes out.
In classic Outlook for Windows: Do not deliver before
Classic Outlook doesn’t use the Schedule send menu. Instead, Microsoft’s steps use the delivery options on the message itself:
- While writing the email, select the Message Options arrow in the Tags group of the ribbon. On the simplified ribbon, go to the Options tab, then More commands.
- Under Delivery options, check Do not deliver before and set the date and time.
- Select Close, then Send.
The message waits in your Outbox until the delivery time. To send it early, open it from the Outbox, clear Do not deliver before, select Close, then Send.
Heads up: Microsoft says classic Outlook “needs to be online and connected for this feature to work.” If your laptop is off or offline at the delivery time, the email won’t leave on time.
Classic Outlook can also delay delivery of every email you send, by up to 120 minutes.
You set it up with a rule: File > Manage Rules & Alerts > New Rule > Apply rule on messages I send, then check defer delivery by a number of minutes.
My guide to creating inbox rules in Outlook covers the rule basics.
When Schedule send doesn’t show up
If the arrow next to Send has no Schedule send option, check these first:
- The account type. Microsoft says this feature isn’t available for IMAP or POP accounts in the new Outlook.
- Which Outlook you’re in. If the steps don’t match your screen, Microsoft suggests you may be in classic Outlook, so use Do not deliver before instead.
Scheduled emails pair nicely with reminders. I set a calendar reminder in Outlook for the morning a big email goes out, so I’m around for the replies.
Want to do more with your Outlook inbox? These are next on my list:
Quick answers
Can I schedule an email in Outlook on my phone?
I only tested scheduling in Outlook on the web, and Microsoft’s help page on scheduled sending covers the web, new Outlook and classic Outlook for Windows, not the mobile app.
Does Outlook need to be open to send a scheduled email?
In Outlook on the web and the new Outlook, the scheduled email waits in your Drafts folder. Classic Outlook is different: Microsoft says it needs to be online and connected for delayed delivery to work (Microsoft Support: Delay or schedule sending email messages).
Where do scheduled emails go in Outlook?
In Outlook on the web and the new Outlook, they wait in the Drafts folder with a [Scheduled] tag. In classic Outlook, they wait in the Outbox.
How do I send a scheduled email right now?
Open it from Drafts, select Cancel send, then select Send. In classic Outlook, open it from the Outbox, clear Do not deliver before, then send it.

I am Carissa Gudinoa, a technology buff, and Office online and Apple expert with over 9 years of experience. I am passionate about helping others get the most out of their Apple devices. I have written extensively about Apple products and technologies. I am committed to providing my clients with the best possible service and am always up-to-date on the latest Apple products and features. I also write extensively on other software available for use at minimal cost or free. This includes Word Online, Outlook Online, Excel Online, and other Office online programs… Check out more.